Windows App SDK Desktop App with native interop - Part 1
As the Windows App SDK moves beyond release 1.0 and begins to expand it's capability, I thought it was time to start exploring it more fully. In this post I will explore the integration of a native API into a Windows App SDK. You can learn more about Windows App SDK here: Windows App SDK
The source code for the WinApp can be found here: HemanWinUI.
Part 2 of this tutorial can be found here.
Choosing a Native API
As I want to explore the entire process of building a native API from source through to including it in a Windows App SDK desktop application (I'll call it a WinApp from now on), I wanted to choose a simple standalone API. I settled on the heman library:
This toy project is a tiny MIT-licensed C library of image utilities for dealing with height maps, normal maps, distance fields, and the like. It has a very low-level API, where an "image" is simply a flat array of floats. There are no dependencies and only one header file.
Preparing my environment
I have various builds of Visual Studio installed - 2019, 2022 (release and preview). I also have Visual Studio Code installed and I plan to use VSCode to compile the C API.
I noticed that the heman library uses CMake, so I installed the following:
A guide for getting started with CMake in Visual Studio Code is available here.
Building the API on Windows
-
Open Windows terminal and clone the repo
git clone https://github.com/prideout/heman.git -
Open the directory in Visual Studio Code:
cd heman code . -
When VSCode launched, I was invited to select a kit for to use for the API. I chose Visual Studio 2022 Enterprise Release amd64. This configured the CMake tool.
Important: This will compile the output to target x64 - remember this and configure the WinApp to x64 later on to match.
-
To configure the project, open the Command Palette [Ctrl+Shift+P] and run CMake: Configure.
-
To build heman, open the Command Palette [Ctrl+Shift+P] and run the CMake: Build command.
This will build a static library heman.lib by default. To use this library in a WinApp, we'll need to update the build process to create a DLL instead.
-
To configure the cmake to create a DLL, open the CMakeLists.txt file and locate the following line:
add_library(heman STATIC ${HEMAN_SOURCE} ${MATH_SOURCE}) -
Update the line to the following:
include (GenerateExportHeader) add_library(heman SHARED ${HEMAN_SOURCE} ${MATH_SOURCE})Note: As well as the
include, notice that theadd_librarystatement usesSHAREDinstead ofSTATIC. -
Rebuild heman, open the Command Palette [Ctrl+Shift+P] and run the CMake: Build command. Notice in the output that heman.dll is now produced.
-
To review the functions that have been exported within the DLL, I use the DLL Export Viewer tool. launch the tool and open the heman.dll. Unfortunately there are no exported functions:
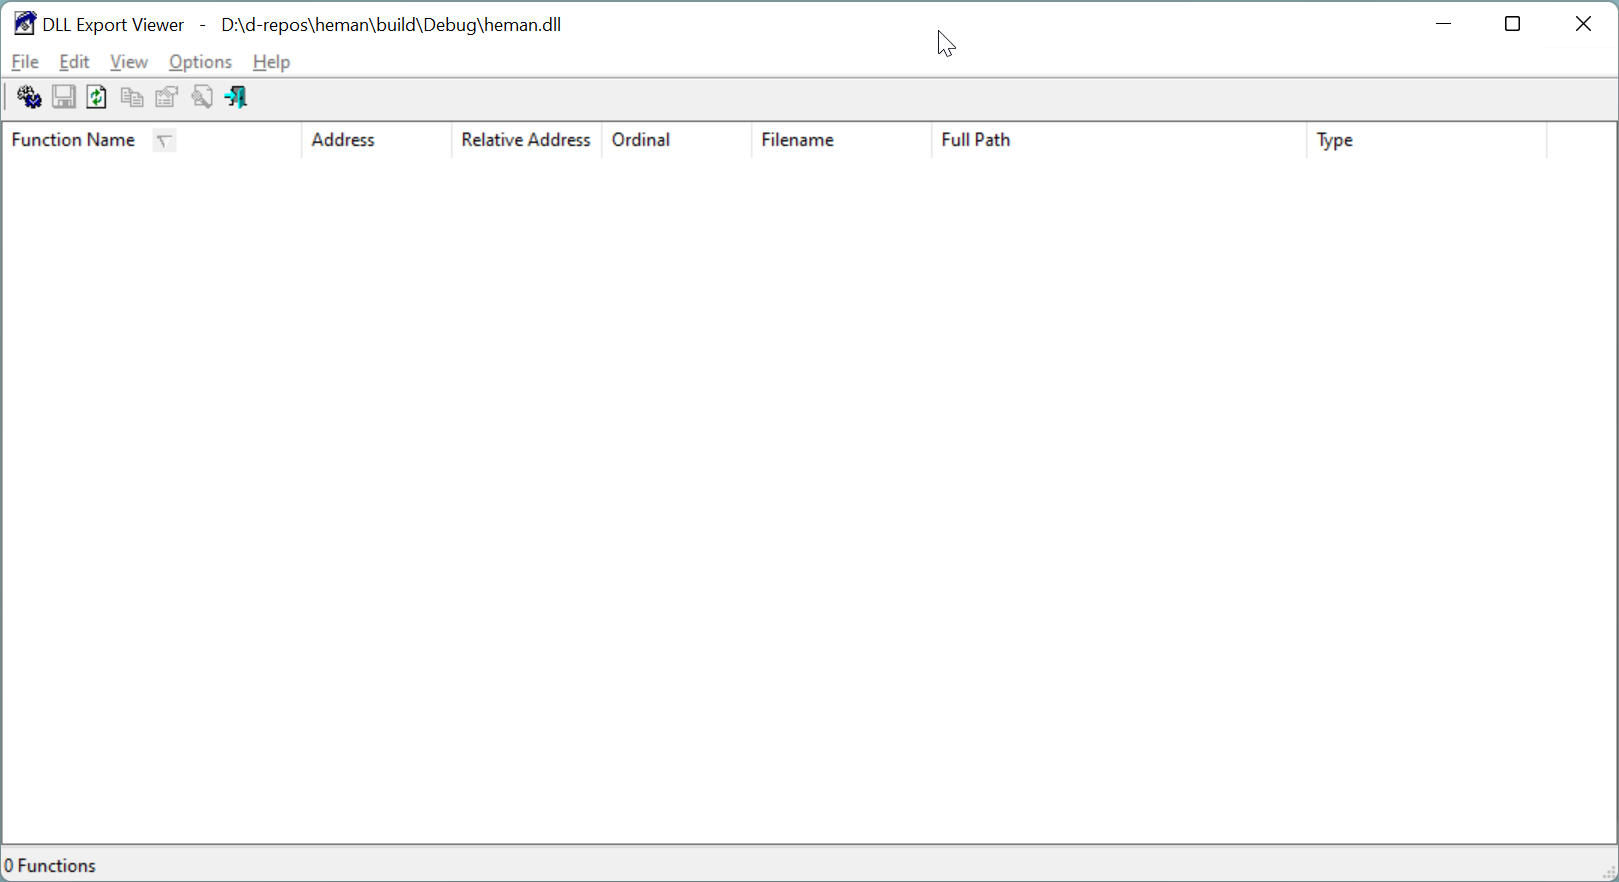
-
There are a number of ways that functions can be exported via a DLL - Microsoft documentation discussing approaches can be found here: Exporting from a DLL.
If writing code from scratch, or if you wish to update existing source, function definitions in a header file are prefixed with
__declspec(dllexport)- see Exporting from a DLL Using __declspec(dllexport) for more details. For example:int Sum(int a, int b);would become:
__declspec(dllexport) int Sum(int a, int b);Another approach, that I shall use here, is to create a module definition file that lists the desired exports - see Exporting from a DLL Using DEF Files for more information.
-
To export functions, we need to know the names of each function. Open include/heman.h and you will see the API function definitions. For example:
// Peek at the stored texel values in a SWIG-amenable way.
void heman_image_array(heman_image* img, HEMAN_FLOAT** outview, int* n);

// Peek at the given texel value.
HEMAN_FLOAT*heman_image_texel(heman_image*, int x, int y);
Each function we wish to export will need to be added to a module definition file.
-
To add a module definition, add a new file at the same directory level as CMakeLists.txt and name it heman.def.
-
Open heman.def and add the following:
LIBRARY EXPORTS heman_image_create heman_image_info heman_image_data heman_image_array heman_image_texel heman_image_sample heman_image_clear heman_image_destroy heman_image_extract_alpha heman_image_extract_rgb heman_color_create_gradient heman_color_set_gamma heman_color_apply_gradient heman_color_from_grayscale heman_color_to_grayscale heman_color_from_cpcf heman_generate_island_heightmap heman_generate_rock_heightmap heman_generate_planet_heightmap heman_generate_archipelago_heightmap heman_generate_archipelago_political heman_generate_simplex_fbm heman_lighting_apply heman_lighting_compute_normals heman_lighting_compute_occlusion heman_lighting_set_occlusion_scale heman_distance_create_sdf heman_distance_create_df heman_distance_create_cpcf heman_distance_from_cpcf heman_distance_identity_cpcf heman_import_u8 heman_export_ply heman_export_with_colors_ply heman_export_u8 heman_ops_stitch_horizontal heman_ops_stitch_vertical heman_ops_normalize_f32 heman_ops_max heman_ops_step heman_ops_stairstep heman_ops_percentiles heman_ops_sweep heman_ops_laplacian heman_ops_sobel heman_ops_accumulate heman_ops_warp heman_ops_warp_points heman_ops_extract_mask heman_ops_replace_color heman_ops_merge_political heman_ops_emboss heman_points_create heman_points_destroy heman_points_from_grid heman_points_from_poisson heman_points_from_density heman_draw_points heman_draw_colored_points heman_draw_colored_circles heman_draw_splats heman_draw_contour_from_points heman_get_num_threads -
Reopen the CMakeLists.txt file and locate the following line:
add_library(heman SHARED ${HEMAN_SOURCE} ${MATH_SOURCE}) -
Update the line to the following:
include (GenerateExportHeader) add_library(heman SHARED ${HEMAN_SOURCE} ${MATH_SOURCE} heman.def) -
Rebuild heman, open the Command Palette [Ctrl+Shift+P] and run the CMake: Build command.
-
Use the DLL Export Viewer tool and open the heman.dll. This time you will see all of the exported functions:
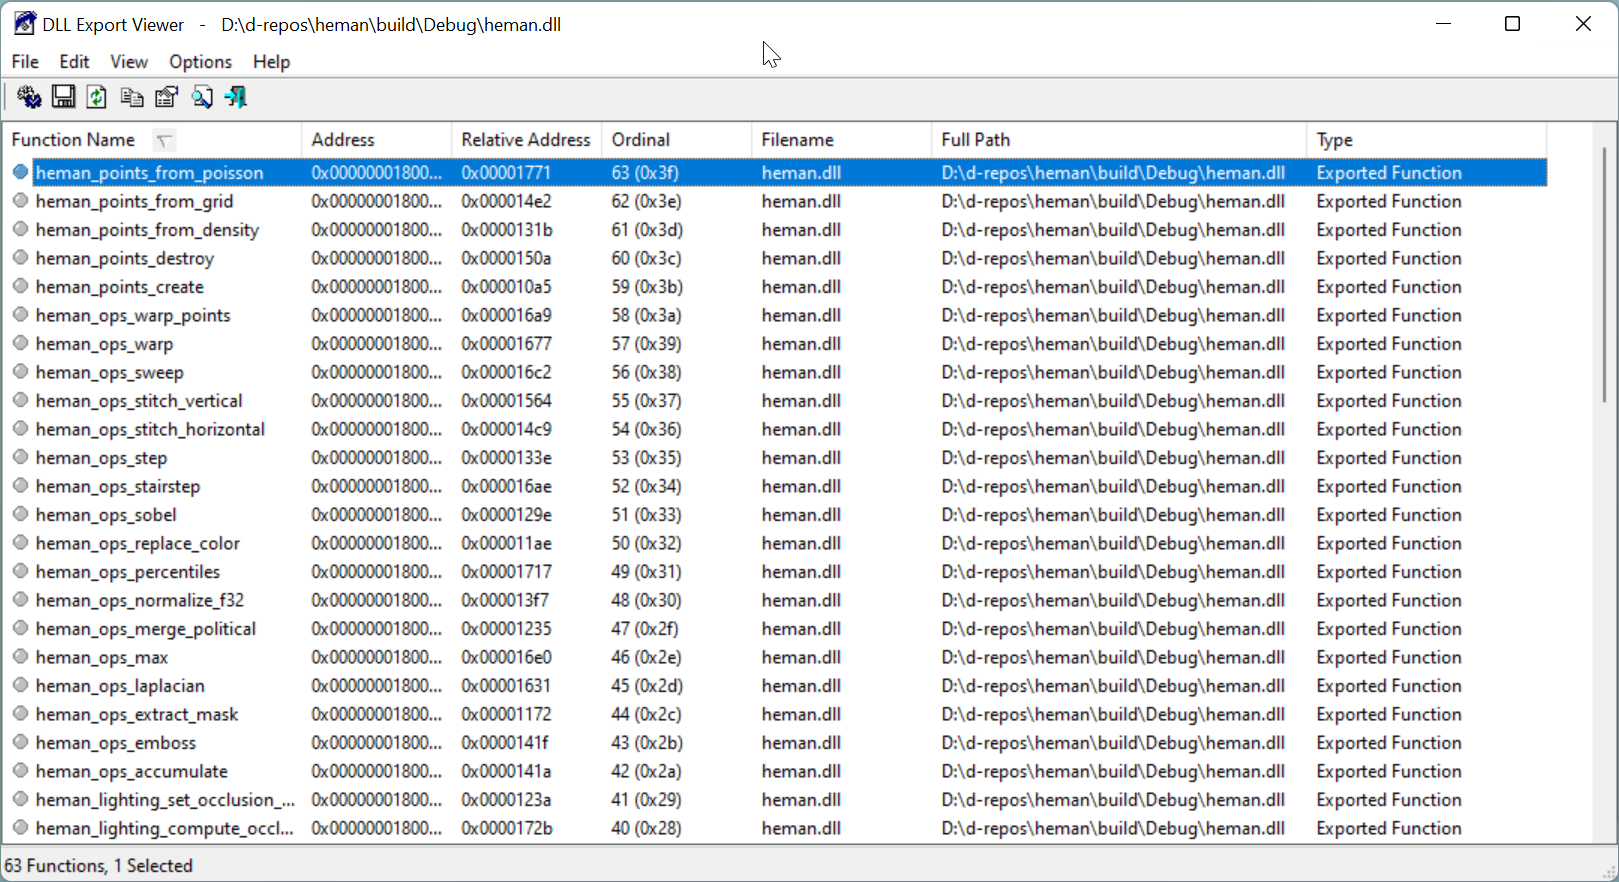
-
In order to use the output of the heman APIs, we need to convert them to PNGs. The necessary utilities are included in the test project, however we need to update them so they can be exposed in the DLL.
-
Navigate to the test folder and copy the existing hut.h file (which contains the actual implementation of the utilities) to hut.c. Open the new hut.c file and replace the following lines:
// Heman utilities.  This is part of the test suite, not the core library.

# define STB_IMAGE_IMPLEMENTATION
# define STB_IMAGE_WRITE_IMPLEMENTATION
# define STB_IMAGE_RESIZE_IMPLEMENTATION
# pragma GCC diagnostic push
# pragma GCC diagnostic ignored "-Wunused-variable"
# pragma GCC diagnostic ignored "-Wunused-value"
# pragma GCC diagnostic ignored "-Wpointer-sign"
# pragma GCC diagnostic ignored "-Wunknown-pragmas"
# pragma GCC diagnostic ignored "-Wmaybe-uninitialized"
# include "heman.h"
# include "stb_image.h"
# include "stb_image_resize.h"
# include "stb_image_write.h"
# pragma GCC diagnostic pop
with
// Heman utilities. This is part of the test suite, not the core library. # include "hut.h" -
Open the hut.h file and replace the contents with the following:
// Heman utilities.  This is part of the test suite, not the core library.

#define STB_IMAGE_IMPLEMENTATION
#define STB_IMAGE_WRITE_IMPLEMENTATION
#define STB_IMAGE_RESIZE_IMPLEMENTATION
#pragma GCC diagnostic push
#pragma GCC diagnostic ignored "-Wunused-variable"
#pragma GCC diagnostic ignored "-Wunused-value"
#pragma GCC diagnostic ignored "-Wpointer-sign"
#pragma GCC diagnostic ignored "-Wunknown-pragmas"
#pragma GCC diagnostic ignored "-Wmaybe-uninitialized"
#include "heman.h"
#include "stb_image.h"
#include "stb_image_resize.h"
#include "stb_image_write.h"
#pragma GCC diagnostic pop

heman_image* hut_read_image(const char* filename, int nbands);

void hut_write_image(const char* filename, heman_image* img, float minv, float maxv);

void hut_write_image_scaled(const char* filename, heman_image* img, int dwidth, int dheight);
We removed the function implementations (now in hut.c) and added the
include "heman.h"line. -
Return once again to the CMakeLists.txt file and locate the following line:
add_library(heman SHARED ${HEMAN_SOURCE} ${MATH_SOURCE} heman.def)Update it to include the new hut.c file as follows:
add_library(heman SHARED ${HEMAN_SOURCE} ${MATH_SOURCE} test/hut.c heman.def) -
Open the heman.def file and add the following to the bottom of the list
hut_read_image hut_write_image hut_write_image_scaled -
Rebuild heman, open the Command Palette [Ctrl+Shift+P] and run the CMake: Build command.
-
Use the DLL Export Viewer tool and open the heman.dll. You should be able to find the hut functions added to the list.
-
We are now ready to consume this DLL in a WinApp.
Create a WinApp project
-
Ensure you have installed and configures Visual Studio 2022 as documented here: Install tools for developing apps for Windows 10 and Windows 11.
-
In Visual Studio, create a Blank App, Packaged (WinUI 3 in Desktop) C# app - name is HemanWinUI.
-
Once the solution opens, change the solution plaforms selection to match the compilation target you used for the heman.dll - for example, I am using x64;
-
To ensure you have everything setup correctly, compile and run the application. The "awesome" default app will launch - click the button for an instant win...
-
Close down the app and briefly review the project. If you are familiar with WPF or UWP apps, the project layout will be somewhat familiar:
- App.xaml defines global resources
- App.xaml.cs contains the app startup code. It is much simpler by default than the UWP equivalent, although it can support similar scenarios. WPF developers will feel right at home. Instead of creating a Frame control and assuming navigation is required, etc. a WinApp creates a MainWindow and activates it.
- MainWindow.xaml defines the glorious default UI.
- MainWindow.xaml.cs implements the code-behind that supports the click functionality.
In this tutorial, I will be updating the UI in MainWindow and adding a class that integrates with the heman.
-
To incorporate the heman API into the app, add the heman.dll to the HemanWinUI project. Once added, select the heman.dll file and update the following properties:
- Build Action to Content
- Copy to Output Directory to Copy if newer.
-
Add a new class to the project and name it HemanApi.cs.
-
Update the usings as followings:
using System.Runtime.InteropServices; using CC = System.Runtime.InteropServices.CallingConvention; -
To create a simple example that illustrates the integration to that heman API, update the class definition to the following:
internal class HemanApi
{
    public int GetNumberOfThreads()
    {
        return NativeMethods.heman_get_num_threads();
    }

    private static class NativeMethods
    {
        const string DLL = "heman.dll";

        [DllImport(DLL, CallingConvention = CC.Cdecl)]
        internal static extern int heman_get_num_threads();
    }
}
This code follows the recommended practice of using an nested private static class named NativeMethods to encapsulate the
DLLImportattributed external function definitions. The HemanApi class then exposes a more C# friendly method for consuming the native method. As the implementation grows, these methods will increase in complexity.Note: To learn more about native interoperability, P/invoke, and best practices, refer to the documentation here: Native interoperability
-
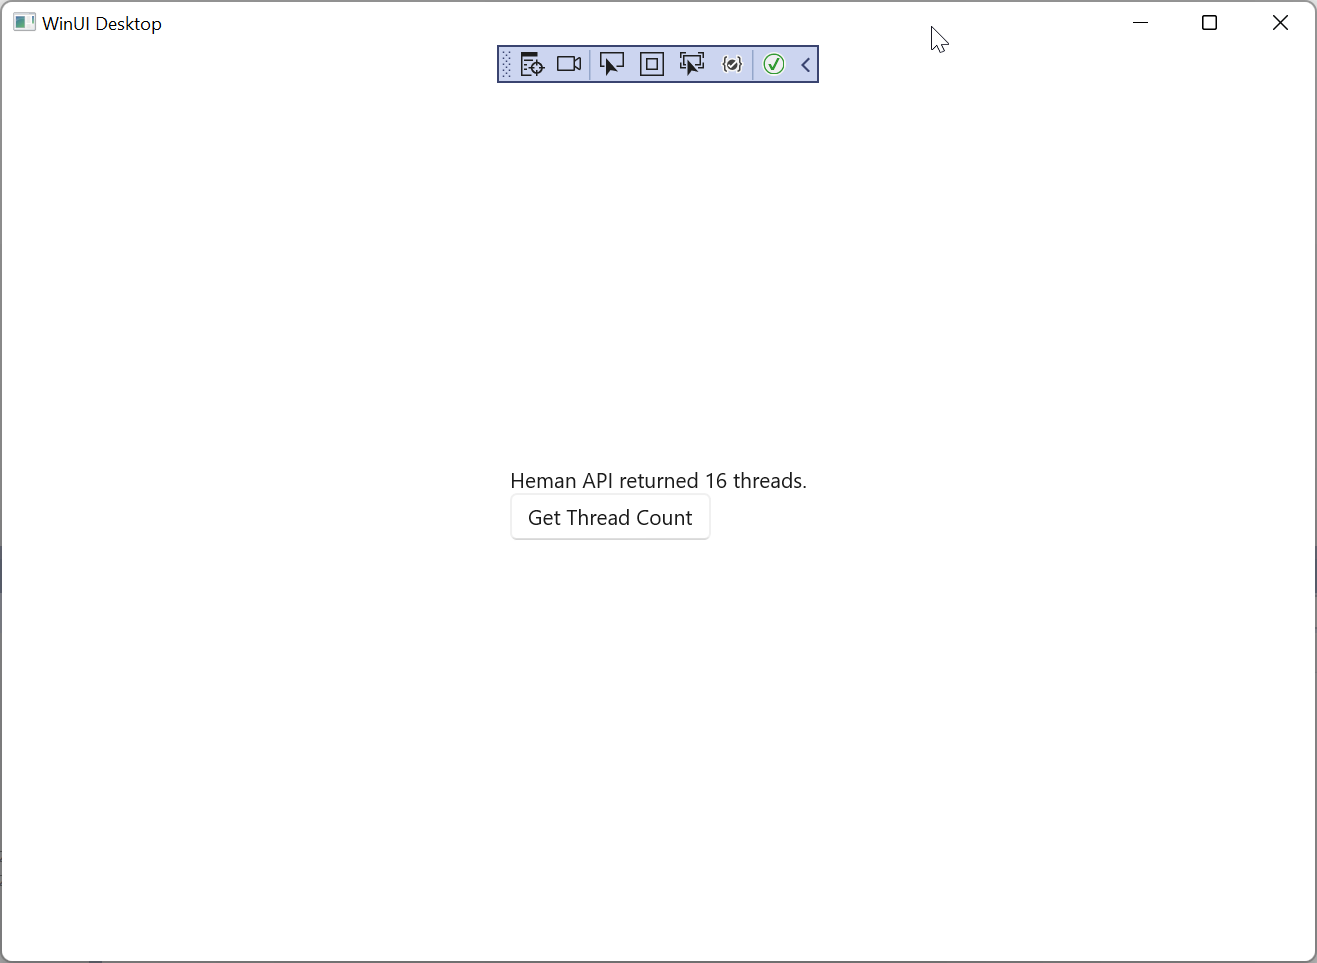
To implement a simple UI to interact with this native API, open MainWindow.xaml and replace the exiting
<StackPanel>with the following:<StackPanel Orientation="Vertical" HorizontalAlignment="Center" VerticalAlignment="Center"> <TextBlock x:Name="ThreadInfo" Text="No data retrieved yet." /> <Button Click="ThreadButtonClick">Get Thread Count</Button> </StackPanel>A very simple UI.
-
Switch to the code-behind - MainWindow.xaml.cs and replace it with the following code:
using Microsoft.UI.Xaml;

namespace HemanWinUI
{
    /// <summary>
    /// An empty window that can be used on its own or navigated to within a Frame.
    /// </summary>
    public sealed partial class MainWindow : Window
    {
        public MainWindow()
        {
            this.InitializeComponent();
        }

        private void ThreadButtonClick(object sender, RoutedEventArgs e)
        {
            var hemanApi = new HemanApi();
            var threadCount = hemanApi.GetNumberOfThreads();
            ThreadInfo.Text = $"Heman API returned {threadCount} thread{(threadCount == 1 ? string.Empty: "s")}.";
        }
    }
}
This straightforward code creates an instance of the HemanApi class, retrieves the thread count from the heman native method and then displays the value.
Important: If a BadImageFormatException is raised, ensure your WinApp target and the target you build the heman.dll match - i.e.:
- WinApp target - x64
- heman.dll target - amd64
Wrap up
In this tutorial I showed how a C API using the CMake utility can be built on Windows and added to WinApp desktop project. I also showed how a simple native API call can be made from the WinApp.
In the next part of this tutorial I will increase the complexity and deal with generating some height maps and displaying them within the WinApp.
The source code for the WinApp can be found here: HemanWinUI.